Want to calculate Azure costs accurately and avoid bill shocks? You’re not alone. Many businesses struggle with unpredictable cloud expenses. In this guide, we’ll walk you through everything you need to know to calculate Azure costs like a pro—using tools, strategies, and real-world insights.
Why It’s Crucial to Calculate Azure Costs

Understanding your cloud spending isn’t just about saving money—it’s about making smarter business decisions. When you can calculate Azure costs effectively, you gain control over your budget, optimize resources, and align your IT strategy with financial goals. Without proper cost tracking, companies often overspend by 30% or more due to idle resources, misconfigured services, or lack of visibility.


Preventing Cloud Bill Surprises
One of the biggest pain points for IT managers is the dreaded “bill shock” at the end of the month. This happens when usage spikes unexpectedly—perhaps due to auto-scaling, unmonitored test environments, or forgotten virtual machines running 24/7. By learning how to calculate Azure costs proactively, you can forecast spending, set alerts, and avoid unpleasant surprises.
Microsoft offers built-in tools like Azure Cost Management + Billing that provide real-time insights into usage patterns. These tools allow you to track spending across subscriptions, resource groups, and tags, giving you granular visibility. According to a Microsoft Learn guide, organizations that actively monitor their costs reduce unnecessary spending by up to 40%.
Aligning IT Spend with Business Goals
When you can calculate Azure costs accurately, you shift from reactive to strategic financial planning. For example, if your marketing team plans a major campaign that will drive traffic to your web app, you can estimate the additional compute and bandwidth costs in advance. This allows you to request budget approval, scale resources efficiently, and decommission them after the event.
- Cost transparency enables better communication between IT and finance teams.
- Accurate forecasting supports long-term cloud adoption strategies.
- Visibility into per-project or per-department spending fosters accountability.
“Cost management is not an IT problem—it’s a business imperative.” — Microsoft Azure Architecture Center
Key Components That Affect Azure Pricing
To calculate Azure costs accurately, you must first understand what drives them. Azure’s pricing model is complex because it’s usage-based and varies across services, regions, and configurations. Let’s break down the main cost drivers so you can build a realistic budget.
Compute Resources: VMs, Containers, and Serverless
Compute is often the largest portion of an Azure bill. Whether you’re using Virtual Machines (VMs), Azure Kubernetes Service (AKS), or serverless functions like Azure Functions, each has a different pricing structure.
- Virtual Machines: Priced hourly or per second (for eligible VMs), based on size (CPU, RAM, GPU), OS type, and whether they’re reserved or pay-as-you-go.
- Containers (AKS): While the control plane is free, you pay for the underlying VMs, storage, and networking used by your containerized workloads.
- Serverless (Functions, Logic Apps): Billed based on execution time and number of executions, making them cost-effective for sporadic workloads.
For example, a D4s v3 VM in East US costs around $0.192/hour on pay-as-you-go, but drops to ~$0.115/hour with a 1-year reservation. Always compare options before deployment. Use the Azure Pricing Calculator to model different scenarios.
Storage and Data Transfer Costs
Storage might seem cheap at first glance, but it adds up quickly—especially when combined with data transfer fees. Azure offers several storage tiers: Hot, Cool, and Archive, each with different access speeds and prices.
- Standard HDD (Cool) storage costs about $0.0098/GB/month, while Premium SSD (Hot) can be $0.177/GB/month.
- Data egress (outbound data transfer) is charged after the first 5 GB/month (free tier). Transferring 1 TB from Azure to the internet in North America costs ~$87.
- Inbound data transfer is free, but cross-region replication or peering may incur charges.
Many organizations overlook egress fees until they migrate large datasets or serve global users. Always factor in data movement when you calculate Azure costs for applications with high download volumes.
How to Calculate Azure Costs Using the Pricing Calculator
The Azure Pricing Calculator is one of the most powerful tools available to estimate your monthly bill before deploying any resources. It’s free, intuitive, and supports nearly every Azure service.
Step-by-Step Guide to Using the Calculator
Here’s how to use the calculator to calculate Azure costs for a typical web application:
- Go to https://azure.microsoft.com/en-us/pricing/calculator/.
- Add services like Virtual Machines, App Services, SQL Database, Blob Storage, and Bandwidth.
- Configure each service: select region, instance size, storage capacity, and estimated usage (e.g., 720 hours/month for a VM).
- Adjust for reservations: toggle 1-year or 3-year reserved instances to see potential savings.
- Review the total estimated monthly cost and export the estimate as a PDF or CSV.
You can save multiple scenarios (e.g., development vs. production) and share them with stakeholders. This is especially useful during project planning or budget reviews.
Pro Tips for Accurate Estimations
To get the most accurate results when you calculate Azure costs using the calculator:
- Use realistic usage assumptions. Don’t assume 100% uptime if your app only runs during business hours.
- Include networking components like Load Balancers, Application Gateways, and DNS.
- Factor in support plans—Basic is free, but Production support starts at $29/month.
- Consider Azure Hybrid Benefit if you have existing Windows Server or SQL Server licenses.
“The Azure Pricing Calculator helped us reduce our initial cloud budget estimate by 35% just by identifying over-provisioned VMs.” — IT Manager, Mid-Sized SaaS Company
Leveraging Azure Cost Management + Billing Tools
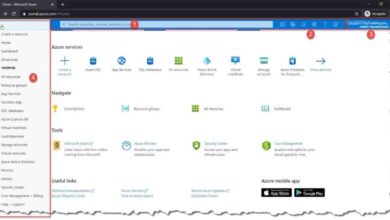
While the pricing calculator helps with forecasting, Azure Cost Management + Billing is essential for monitoring actual spending. This native tool integrates directly with your Azure subscription and provides real-time analytics, budgeting, and optimization recommendations.
Setting Up Budgets and Alerts
One of the first things you should do after creating an Azure subscription is set up a budget. Here’s how:
- Navigate to the Azure portal and open Cost Management + Billing.
- Select your subscription or resource group.
- Create a new budget under Budgets.
- Define the scope, amount (e.g., $500/month), and time period (monthly, quarterly).
- Set alert thresholds (e.g., notify when 80% of budget is reached).
You can configure alerts to send emails or trigger Azure Monitor actions. For teams using Slack or Microsoft Teams, integrate with webhooks to post cost alerts directly into chat channels.
Analyzing Cost Trends and Anomalies
The Cost Analysis dashboard lets you visualize spending over time, drill down into specific services, and identify anomalies. For example, you might notice a spike in Azure Functions usage on weekends—perhaps due to automated batch jobs.
- Use filters to view costs by resource group, tag, service name, or location.
- Compare month-over-month trends to spot growth patterns.
- Export data to Power BI for advanced reporting and dashboards.
Microsoft also provides anomaly detection, which uses machine learning to flag unusual spending behavior. This feature can catch misconfigurations or security incidents (like crypto-mining attacks) early.
Optimizing Costs with Reserved Instances and Savings Plans
If you’re looking to calculate Azure costs with long-term savings in mind, Reserved Virtual Machine Instances and Compute Savings Plans are game-changers. They offer significant discounts compared to pay-as-you-go pricing.
Understanding Reserved Instances (RIs)
Azure Reserved VM Instances allow you to commit to using specific VM sizes for 1 or 3 years in exchange for lower rates. Discounts range from 20% to 72%, depending on the VM type and commitment length.
- RIs are ideal for steady-state workloads like domain controllers, databases, or ERP systems.
- You can exchange or cancel reservations within 30 days (with some restrictions).
- RIs apply to specific regions, VM families, and OS types—plan carefully.
To calculate Azure costs with RIs, use the Azure Reservations dashboard to compare pay-as-you-go vs. reserved pricing. The tool even suggests eligible resources for reservation based on your usage history.
Exploring Compute Savings Plans
Introduced as a more flexible alternative, Compute Savings Plans offer up to 65% savings on compute usage across Azure services—including VMs, AKS, and Azure Functions—without locking into specific VM types.
- Savings Plans apply automatically to eligible usage, making them easier to manage than RIs.
- They’re ideal for dynamic environments where VM types change frequently.
- Commitments start at $20/month and scale with usage.
Unlike RIs, Savings Plans don’t require upfront payment and can be modified monthly. However, you must maintain the committed spend each hour. If your usage drops below the commitment, you still pay the full amount.
“We switched from Reserved Instances to Compute Savings Plans and reduced administrative overhead by 60% while maintaining similar savings.” — Cloud Architect, Financial Services Firm
Using Tags to Track and Allocate Azure Costs
Tags are metadata labels you can apply to Azure resources to organize, track, and allocate costs. They’re essential if you want to calculate Azure costs by department, project, environment, or owner.
Best Practices for Tagging Resources
To get the most value from tagging:
calculate azure costs – Calculate azure costs menjadi aspek penting yang dibahas di sini.
- Define a consistent tagging strategy across your organization.
- Use standard key names like
Project,Environment(Dev, Test, Prod),Department, andOwner. - Enforce tagging with Azure Policy to prevent untagged resources from being deployed.
- Apply tags during resource creation—don’t wait until later.
For example, tagging all development resources with Environment=Dev allows you to filter costs and ensure dev teams don’t exceed their budgets.
Generating Cost Reports by Tag
Once resources are tagged, use Azure Cost Management to generate detailed reports:
- Open Cost Analysis in the Azure portal.
- Group by Tag (e.g., Project Name).
- Filter by time range and subscription.
- Export the report for finance or leadership review.
This level of granularity helps answer questions like: “How much did Project Phoenix cost last quarter?” or “Which department is using the most storage?”
Advanced Strategies to Calculate Azure Costs at Scale
For enterprises with multiple subscriptions, departments, or cloud providers, calculating Azure costs becomes more complex. You need advanced tools and strategies to maintain control and drive efficiency.
Implementing Azure Lighthouse for Multi-Tenant Management
Azure Lighthouse allows managed service providers (MSPs) or internal IT teams to manage multiple Azure tenants from a single interface. This is invaluable for organizations with subsidiaries or clients on separate subscriptions.
- Gain centralized visibility into all environments.
- Apply consistent policies, budgets, and tagging standards.
- Streamline cost reporting across tenants.
With Lighthouse, you can calculate Azure costs across hundreds of subscriptions and identify cross-cutting optimization opportunities.
Integrating with Third-Party Tools
While Azure’s native tools are robust, third-party platforms like CloudHealth by VMware, Datadog, and Prisma Cloud offer deeper analytics, AI-driven recommendations, and multi-cloud support.
- These tools provide predictive cost modeling and automated optimization.
- They integrate with CI/CD pipelines to enforce cost policies during deployment.
- Some offer FinOps workflows to align engineering and finance teams.
For example, CloudHealth can simulate the impact of shutting down non-production resources on weekends—helping you calculate Azure costs under different operational models.
Common Mistakes When Trying to Calculate Azure Costs
Even experienced cloud users make errors that lead to inaccurate cost projections or wasted spending. Avoid these common pitfalls to ensure your calculations are reliable.
Ignoring Idle or Orphaned Resources
One of the biggest sources of waste is idle resources—VMs that are powered on but not in use, or storage accounts holding old backups. These continue to accrue charges even if they’re not actively serving traffic.
- Use Azure Advisor to identify underutilized VMs (e.g., CPU usage < 5% for 7+ days).
- Schedule auto-shutdown for non-production VMs during off-hours.
- Regularly audit and delete orphaned disks, snapshots, and public IPs.
A study by Flexera found that 35% of cloud spending is wasted—mostly on idle resources. Regular cleanup can save thousands per year.
Overlooking Hidden or Indirect Costs
Some costs aren’t obvious when you first calculate Azure costs. These include:
- Management tools: Azure Monitor, Log Analytics, and Application Insights generate logs that cost money to store and query.
- Backup and disaster recovery: Azure Backup and Site Recovery add recurring fees based on protected instances and data size.
- Support plans: Higher-tier support (e.g., Premier) can cost thousands per month.
- Licensing: Some software (like SQL Server on VMs) requires separate licensing fees.
Always review the full pricing page for each service and consider indirect costs in your models.
How do I calculate my Azure costs for free?
You can calculate Azure costs for free using the Azure Pricing Calculator and Azure Free Account. The calculator lets you estimate costs without logging in, while the Free Account gives you $200 credit and access to cost management tools for 12 months.
What is the best way to reduce Azure costs?
The best ways to reduce Azure costs include using Reserved Instances or Savings Plans, shutting down unused resources, leveraging auto-scaling, and applying tags for better cost allocation. Regularly review Azure Advisor recommendations for optimization.
Can I track Azure costs by team or project?
Yes, you can track Azure costs by team or project using tags. Apply tags like ‘Team=Marketing’ or ‘Project=CRM’ to resources, then use Azure Cost Management to group and analyze spending by those tags.
Does Azure charge for inbound data transfer?
No, Azure does not charge for inbound data transfer (data uploaded to Azure). However, outbound data transfer (data leaving Azure) is charged after the first 5 GB per month, depending on the destination region.
How accurate is the Azure Pricing Calculator?
The Azure Pricing Calculator is highly accurate for estimating baseline costs, but actual spending may vary based on usage patterns, unexpected scaling, or additional services. Use it as a starting point and monitor real usage with Cost Management tools.
Calculating Azure costs doesn’t have to be overwhelming. By leveraging the right tools—like the Azure Pricing Calculator, Cost Management + Billing, and tagging strategies—you can gain full visibility into your cloud spending. Combine these with optimization techniques like Reserved Instances, Savings Plans, and third-party tools to not only calculate Azure costs accurately but also reduce them significantly. The key is consistency: monitor regularly, set budgets, and foster a culture of cost awareness across your organization. With these practices, you’ll turn cloud spending from a mystery into a strategic advantage.
calculate azure costs – Calculate azure costs menjadi aspek penting yang dibahas di sini.
Recommended for you 👇
Further Reading: